Before we begin, these are the stuffs we’re gona cover in this guide:
- Installing Counter-Strike: Source
- Creating the server
- Configuring the server
- Installing Mani Admin Plugin (optional)
- Intalling Metamod:Source
- Intalling SourceMod
- Installing Xampp
- Intalling ActivePerl and DBD-mysql
- Installing and configuring HLstatsX: CE
- A bit of port forwarding
Installing and configuring the CS server
- Download and install Counter-Strike: Source (installation instructions will be included). Let’s assume that you’ve installed in C:\Program Files\Counter-Strike Source\
- Go to C:\Program Files\Counter-Strike Source\ and look for srcds.exe. Right click and sent to desktop, which makes a shortcut on the desktop.
- Go to desktop, rename the srcds.exe shortcut to server, right click on it and go to properties.
- In the shortcut tab, add this line in the target field after the srcds.exe" part:
-console -game cstrike +maxplayers 30 +map de_dust2 -secure-console: tells it to run as the console command interface, instead of the GUI, which takes more load than console.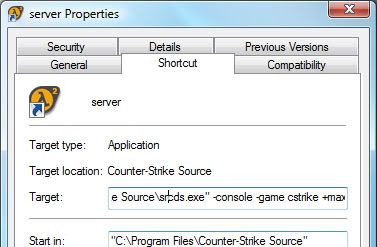
+maxplayers 30: how many players can join the game, in this case its 30.
+map de_dust2: which map the server is going start with, in this case its de_dust2.
-secure: secure the server with Valve Anti Cheat (VAC). - Now it’s time make some basic settings for your server by using the server.cfg file in your C:\Program Files\Counter-Strike Source\cstrike\cfg\. If you don’t have that files, you can create it by using a cfgmaker to help you to generate it easily.
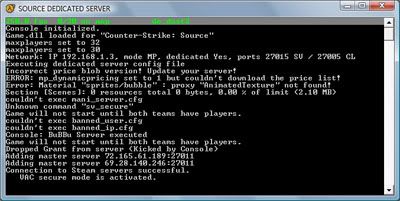
- Go to desktop and run the server shortcut. It should show up the console like the command prompt and starts to load some stuffs. If something goes wrong, go back to the step 4. After loading all those stuffs, run your Counter-Strike game, find your server in the LAN tab and join. Play around a bit; it’s just to check whether it works ;) So, basically your dedicated CS server is up and running on LAN, but it might not work through internet, when your friends try to join. Don’t worry; we’ll cover it up later. Shutdown the server by typing, exit in the console.
- This is an optional step, you may skip to step 9. Mani Admin Plugin makes it easier to manage the server, like kick, ban, change map, slap and more. Download Mani Admin Plugin and extract it into C:\Program Files\Counter-Strike Source\cstrike\. Go to your C:\Program Files\Counter-Strike Source\cstrike\addons\, open CreateVDF.exe, select cstrike and save it as mani_admin_plugin.vdf.
- Run the server and let everything gets loaded. If the server crashes, go back to step 7 and try installing a previous version of Mani Admin Plugin like v1.2 Beta O. After the server loads everything, to check whether Mani Admin Plugin was loaded, type:
plugin_print
...and it should show something like:…or if it doesn’t, something is wrong with your installation. For troubleshooting, configuration and commands check the documentation. You can shutdown the server now.
- In order to make the HLstatsX in game ranking system to work, you need to have SourceMod, and SourceMod requires Metamod:Source. So let’s download Metamod:Source, installation instructions and troubleshooting can be found in AlliedModders Wiki.
- Download SourceMod and extract it into C:\Program Files\Counter-Strike Source\cstrike\. To check whether the addons are loaded, run your server and type:
meta list
…and it should show this line: If it works, shutdown the server and proceed to next step, and if it doesn’t work, go back to step 9 or check out the AlliedModders Wiki.
 - Download the HLstatsX: CE, extract it somewhere, and copy the sourcemod folder into C:\Program Files\Counter-Strike Source\cstrike\addons\.


Installing and configuring the web server
- I’m gona’ use Xampp as the web server pakage. Download and install Xampp as to the instructions.
- “HLstatsX Community Edition uses a Perl daemon to parse the log streamed from the game server”, so Perl has to be installed. You can use the Perl addon for Xampp, or use ActivePerl to run the perl scripts. I use ActivePerl and I recommend using it :)
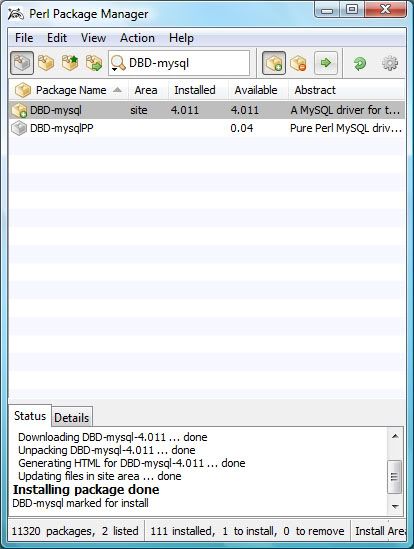
- Open up Perl Package Manager (PPM) by typing ppm in the run. Search for dbd-mysql in the PPM, right click on it and install. Go to file, Run Marked Actions and you’re done!
- Copy the web folder from the extracted HLstatsX file, into htdocs of your Xampp web server. Rename the folder to stats.
- I assume that your web server is working by now. So, go to http://localhost/phpmyadmin/ and make a new database. The username is root and there is no password by default. Let’s call this database, hlstatsx.
- Click on the hlstatsx database on the left side which you created, and go to the 'Import' tab on the top. Under the ‘File to import’, browse to the extracted HLstatsX folder, \sql\install.sql and ‘Go’.
- Open config.php, in your web server stats folder, with a notepad. Edit the file to match your settings:
define("DB_NAME", "hlstatsx");
define("DB_USER", "root"); - the default xampp username
define("DB_PASS", ""); - the default xampp password is *none* - Go to http://localhost/stats/hlstats.php?mode=admin and login as admin, with 123456 as the password. Add your server under game settings and play around a bit with the HLstatsX: CE settings.
Server Address: your internal network IP
Server Port: 27015
Server Name & Rcon Password: See your server.cfg
Game Mod: Sourcemod - Go to your C:\Program Files\Counter-Strike Source\cstrike\cfg\ and open autoexec.cfg with a notepad. Add the following lines:
log on
logaddress_delall
logaddress_add IP:PORT
your IP will be the internal IP and the port can be 27500. - Copy the perl folder from the extracted HLstatsX to the stats web server folder. Open hlstats.conf with a notepad and edit it to match your settings:
DBHost "localhost"
DBUsername "root"
DBPassword ""
DBName "hlstatsx"
Port 27500 - Open up notepad and paste the following line:
perl hlstats.pl
..save it as hlx_run.cmd in that folder. You may create a shortcut for the hlx_run.cmd in your desktop for easy use. Try running it. If it shows an error and closes, try checking your hlstats.conf, or if there is no error and if it doesn’t closes, it’s working!

For Counter-Strike server:You can check whether your web server is working by going to Hidemyass.com, enter your external IP and browse. You can get your external IP by going to Whatismyip.com. If you can access, that means its working! Once you are done, it’s time to finally start the server.
Protocol / Port start - Port end / Port Map
UDP / 1200-1200 / 1200
UDP / 27000-27015 / 27000
TCP / 27020-27039 / 27020
For web server:
Protocol / Port start - Port end / Port Map
TCP / 80-80 / 80
TCP / 443-443 / 443
- Run the hlx_run and the CS server shortcut from the desktop.
- Run your CS game, join your server and add some bots.
- Minimize the game, go to http://localhost/stats/ and check the players and played times whether it matches. If it does, it’s working correctly, if it doesn’t, go back and check your steps carefully, because something is really screwed up!
- Tell your friends your IP and let the fun begin! :D If your IP is dynamic, its’ kinda annoying when your IP changes every time. So, you can use a free DNS service like afraid.org, which has many different kewl domains and they have a free DNS updating software so that, when every time your IP changes, it updates your DNS settings.